Saturday, January 29, 2011

Creative day?

It's been kind of discouraging in a way.  I struggled with this first card forever.  I bought an anywhere square punch from Fiskars a long time ago with the idea of making window cards with it.  I tried 5 times to get the windows straight and it just wasn't going to happen.  I wanted this to be a scene looking out the window panes, but it's just one single window.  I airbrushed the background with Copics and used flower soft on the trees.
The background was another technique that I wanted to try.  It is done by by inking up the flatest side of an embossing envelope and embossing plain white paper.  The example I saw on Stampingmatilda's site was beautiful and the ink was very even.  She did it with distress inks, and I tried that and it came out very blotchy, kind of like putting ink on plastic, which is actually is.  The second attempt was with chalk ink.  It is a thicker ink and usually good on acrylics so I thought it would work well on the plastic embossing folder.  Wrong again.  Maybe if I had a full size ink pad it might have worked better, but I just have the little ones, and it got into the embossed parts which I didn't want.  This is my third attempt with CTMH Garnet dye ink.  It's still a little patchy, but not as bad as with the distress inks.  The leaves are a Martha Stewart stamp, cut out and colored with copics YG41 and YG67.  The bircage is a Studio G stamp, the base is ink distressed with Tea Dye ink.


I'm actually happy with this one.  It is another inspired by Stampingmatilda (Godlieve).  The label is ink distressed with Tea Dye ink with the die still sitting on it, so that it would look "framed" with white.  Image is stamped in same colored ink.  Border is cut with EK border punch.  Sentiment is CTMH.


The next two I did last night.  I made the base card some time ago, and it didn't go with the image I was using, so I set it aside for a while.  The stamped flower, I can't remember who made it, it was an inexpensive one.  I colored it with Copics RV32 and RV34, but it was not done on Neenah paper so it didn't go on real smooth.  Latic border is EK punch.

Friday, January 28, 2011

Slow Friday

It is very quiet in the office today, so I was able to put this card together.  I actually colored the stamp last night and was thinking about what to do with it.  I thought he kind of had a forlorn look on his face like he was missing somebody.  The stamp is an old Inkaddinkado Dawn McGlaughlin.
 Panda is feeling the still today too...haha.  This is how he likes to sleep, with all his toys, or as many as he can gather up together.  He has teddy under his chin, lambie behind, his cloth ribbon, one of his tennis balls and the remaining piece of a toilet paper roll.  We give him the empty rolls and he has a ball chasing it around until he decides to chew it up. 

Thursday, January 27, 2011

Treasured Friends

Still digging through my old stash.  It really pays to hang on to stuff :)  The stamp is a 2001 Stampassions "Baire" by Laurie Campbell. 

Wednesday, January 26, 2011

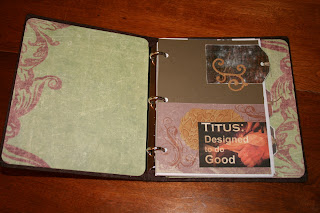
Church Notebook

We are starting a new sermon series at Veritas on Discipleship and Pastor gave us all nice little notebooks to keep all our sermon notes in.  Really great idea, but put a plain black binder with flourescent dividers in my hands and something has to happen!
First I covered it with this really cool handmade paper that I have had around for at least 8 years.  I wanted something flexible enough to go around the binding yet not bind up when you open the book up.  Then of course the sermon series title had to be there, and the church name.  The rest is just fluff or "phoofies" as Dave would say.  I would have done a LOT more to it but since he will be using it too, I restrained myself.
The papers on the inside cover are from a set that I bought about three years ago.  They are in my estimation, timeless in design. 
Of course, the flourescent dividers had to go, replaced by cardstock and some old pre-printed tags I have had in my stash for at least 5 or 6 years.  They were shiny, but I sanded them to better blend, and wound a short piece of twine around the hole.
Flourishes are sizzix die cuts

Though a little less ornate than what I would have preferred, I'm happy with the results and have used some of that old stash.

Monday, January 24, 2011

Call Me

I actually had two little girls that I was working on, but this is the first to be completed.  They are Hero Arts stamps that I got this weekend at Ben Franklin's.  It took several tries, as I'm still working on my copic techniques. 
I've taken two copic classes.  The first one was a total bust, the second one was better, but she asked me if I actually learned anything because I was pretty up on the basics.  I have been watching lots of video's and mostly follow Suzanne Dean's style, but for the black hair I found another instructor and I like this technique better.  It is difficult to do black because it covers up all lines and bleeds very easily if it is worked too much.  When I was coloring her I was actually matching it to a different paper, and that is why she has green paper pieced pockets.  They are checked and I knew I couldn 't copy that.  There is lots of glitz on the papers so I gave her some too on her lace slip, at the neckline and on her shoes with a jellyroll sparkle pen.

Wednesday, January 19, 2011

Wednesday's creations

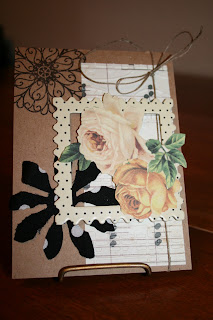
So, today I cleaned and organized my pattern paper rack.  It feels so good to get it done.  I find that I don't have as much pattern paper as I thought I had... which is a good thing.  I hardly ever use pre-printed patterns anymore because I stamp my own.  But I found a bunch of vintage looking papers that I forgot I had.  I guess it got me in the collage mood.  I picked up this Kraft cardstock the other day on sale at Joanne's and wanted to do some cards with it, and this is what I came up with.  The frame on this card was an old orange one that I never would have used as is, but I covered it with pattern paper and inked it.  The card base is dry embossed with an embossing folder.  Picture is cut from pattern paper and leaf is die cut sizzix die.
 Roses are cut from pattern paper.  The stamp is a dollar stamp from Michaels, and the black flower is fabric cut on Vagabond.  This frame is as is, as I liked the pattern on it, but it was from some old stash that I dug out.

Tuesday, January 18, 2011

Tuesday's Cards

I picked up some polka dot fabric at Walmart last week and wanted to try cutting some flowers on the Vagabond.  This is two of them.  The base is dry embossed with Cuttlebug folder on Vagabond.
 I got my March issue of Card Maker Magazine today and this looked fun to try.  I used the TH Caged Bird die for the bird, the leaf is cut from a Sizzix die I bought on sale yesterday.  The green paper on the bottom I used my Fiskars Wave roller that has been sitting in a drawer for a few years.
 This is the original version from the magazine.
Now it's time to clean up my room again, it's starting to get a little out of hand again.

Sunday, January 16, 2011

Sunday Stampin'

After church, shopping and dog grooming I managed to get another card done.  I think I'm going to do one more of the birthday series and then be done with them for a awhile.

Friday, January 14, 2011

Totally Tim

Have I said that I love Tim Holtz products?  OMGosh, that man is so stinkin talented.  Everything on this card is from a Tim Product except the mat paper which is Basic Grey, the ribbon from Target and the two little brads.  The background was embossed with TH Texture Fade.  The flourish is from the Elegant Flourish Die, Bird Cage and bird are the TH Bird Cage Die.  Flowers are fabric cut from the Tattered Flower Die (TH).
The background was inked first with Stormy Sky and Scattered Straw Distress Ink. Then I used a spritz made with Sunflower Sparkle Perfect Pearls, which isn't actually Tim's but Ranger, the same company that he designs for.    The bird cage was embossed with TH Distress embossing powdered and inked with Stormy sky.  I actually did the background a couple weeks ago and it was waiting for the right artwork to put on it.  I really love the way this card came out.  Now, how else can I use this little bird cage and make it look different?

Thursday, January 13, 2011

Happy Birthday

I am having so much fun with these Close to My Heart stamps and DCWV glitter stack.  The cake is colored in with Copics, highlighted with JellyRoll Glaze and glitter pens.
 I wanted a little accent in the black and grey, so colored in a few triangles with Copics as well.

Wednesday, January 12, 2011

Frazzled?

Hmm... maybe this reflects my inner feelings.  No, not really.  But I am loving working with the bright colors and glitz.
 The stamps are Unity, paper is DCWV Glitter Mat Stack.  Border cut with EK Punch.  Image colored with Copics.

Tuesday, January 11, 2011

Watermelon Girl

This is another one of the 8 year old stamps that I bought on eBay.  It took me three tries to get her colored right.  The first time the hair bled over the line, the second is was the foot.  This time it came out better.  I asked it and airbrushed the background.
I've also had these star paper clips forever and never used them.  The ribbons are from Target $1 spot.  For some reason, a little girl in coveralls just reminds me of something Americana.

Saturday, January 8, 2011

Technique Card

I'm not jump up and down crazy about this card, but it has some pretty elements to it.  First of all, the background paper is done from white card stock.  I smeared distress inks Victorian Velvet and Stormy sky on the glass mat (you could use a craft mat).  Then I squished the cardstock into it.  I let that dry, and then spritzed it with a water/sunflower perfect pearls solution.  It gives it a sheen that can't be seen in a scan.  Then when dry, I ran it through with a T.H. embossing folder.


The squares are heat embossed in black and then the flower part is painted in with the same perfect pearls color.  I used two different flourish stamps.  The first is a bolder flourish, which I will explain in a minute and the second is I think Inkadinkado.

This is the larger flourish stamp.
I made this stamp with sticky back fun foam and a die cut.  The technique is on Tim's blog.  It is mounted on the hard plastic packaging that the dies and other supplies come in.  I just cut it and rounded the corners for easier handling.  However, when I stamped with it I actually mounted the whole thing on an acrylic block with repositionable double sided tape.  I found earlier that it was a little difficult to stamp with just the plastic backing. 
The reason why I used two stamps is because I really prefer a finer image for flourishes, but I'm sure it will work fine for some things. I've also done the keyholes and hinges.

Friday, January 7, 2011

A Little Different

I did the stamped image a while ago, just waiting for what I wanted to do with it.  The pattern paper is Basic
Grey. 


 The yellow flowers are from an EK punch.  Machine stitching.

 This bear stamp is one that I bought years ago from Ebay.  I bought a bunch of them before I started scrapbooking, and didn't have a clue what I was doing.  In my very first scrapbook I used one stamp, and then they kind of just got stuck in a box only to be resdiscovered now.  I was practicing my copic skills with it.  I didn't like the sentiment that was on top, so cropped it out with the die cut.

Thursday, January 6, 2011

Sillhouette 2

CTMH stamp set, same as yesterday's, just different kids.  Fence is cut from white chipboard painted with copics and Rock Candy Crackle Paint.
I worked on a couple inky backgrounds today, but had to get this card out of my head before I did the other cards.
Cut the frame for the sentiment with two dies, one inside the other.  I wanted a thinner frame, but this was the best I could do.  I've decided though, that out of all my thin label die cuts, this one is my fav.  Not sure that I like the placement of the birds, It makes it all look a little too balanced.  Originally they were going to be sitting on fenceposts, but then I cut the bottom of the fence down and duh.... it made the fence shorter.  So I added the grass ao ir qoulsn'r look like they were hovering.

Wednesday, January 5, 2011

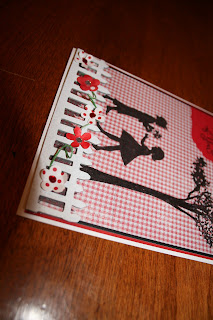
Sillhouette

Just got this die last night.  It's Tim Holtz Alterations.  I have been planning for a long time how I would use it, and hadn't thought of this until I saw a different sillhouette with a larger red check and liked it.  This was the closest I could come to it.  I had to color in the black with Copics as the design shown through, but it  turned out pretty good.

 
 The fence is cut from Grungeboard and inked with white pigment ink.  I tried using white chipboard, but didn't like the look of it.  The grungeboard gives it a cool texture.  The green vine is ctmh waxy flax that I colored with copics.  Flowers were punched from small EK punch.  Main stamp set is CTMH.  Going to try another one with different silhouette and blue background with red polka dots.  What do you think?

Tuesday, January 4, 2011

I love this stamp

I puttered around with this one in my spare time today.  I'm really enjoying just taking my time (unlike doing my Christmas cards) and doing fun things and hopefully honing my copic skills.

Another one with the InkaDinkaDo stamp set.  I'm still not sure if I am doing the shading correct or not, but with this stamp it looks good anyway.
The background is distress inked and the flowers are colored with copics and highlighed with Jellyroll pens.  Sentiment is a Unity Stamp.  Labe is cut and mounted on base and hand cut for edge.  I love the combination of blue and brown.

Sunday, January 2, 2011

Third Card for the year

I've had  this card in my head for a while and got this stamp the other day on sale at JoAnne's.  It's not quite as frilly as I had pictured because the image took up more room.  Was  originally going to put it on the larger card base, but it fit better here.
The Stamp is InkaDinkaDo.  Label is cut with TH 'On the Edge" die.  Colored with Copics.  Lattice from EK Punch.  Flowers CTMH.
 Leaves were cut from another stamp from the same set as the flowers and only adhered on the end so they would be somewhat dimensional.  Ribbon is weaved threw the lattice before adhering to card.  I am happy with the way it turned out, even though it's not exactly as imagined.  Guess the rest of the elements will go on another card :) .

First Creations of the Year

Should have posted these last night, but I was up too late doing them.  Then couldn't sleep so had to get up again.  Finally back to bed at 4:30 am.  Not a good way to start the year, but I'm happy with my creations.

I got this Close to My Heart stamp at least a couple years ago, and have never used it.  I thought it was cute when I ordered it, but since I didn't do coloring until I got the Copics, I had't used it.  So glad I waited, it was so much fun to do.  I also found a cute paper stack that I forgot I had.  It is DCWV embossed and glittered paper.  Flourish and label cut with Vagabond.  Brown border is from an EK punch.  Ribbon generic.  Pearls are JoAnne's 1$ stuff.
 I wish the cake would show p better, I was so happy with the way it turned out.  It is colored with Copics and then I filled in the white area on the cake, and the cake stand with Jellyroll  pen "Glaze."  It is so cool, because it actually looks like icing on the cake, and just makes it 'pop' right out.  I didn't cover the flowers. 

Background is the same paper stack as above.  Ribbon is from Target in the $1 section.


Cake dish is coated with Glaze like the other one.


Saturday, January 1, 2011

Happy New Year! It's done.

I got it all done before the end of the year!  Added a 6 foot table where the cutting table.  Now these two tables contain everything that was currently on one table.  No wonder I always got buried!  Don't know if I'm going to leave the 2 footer there or not.
 Moved the cutting table to the east of the main table.  Added the little white drawers that were formerly in the closet holding a bunch of burned out pens.  Now they hold my adhesives, some tools and bling that used to be laying around on the table, or  in an open box.  There are actually two drawers of adhesives, including tape runners, glue dots, pop dots, dimensional glue dots, sheet adhesives, vellum tape and glue sticks.  Who would have ever thought there were so many ways to adhere paper to a surface.
 This is the embossing table.  Full jars sit on the shelf, but I now use the plastic food storage to put them in and it is so much easier.  Just keep a plastic spoon in each one and I can apply it to  the image and the extra all goes back in to the container, and no clean up   Love it.
 The magazine racks contain Neennah paper in one.  You can't use Copics on just any paper because it will bleed out of the design.  The other rack has scratch paper that I salvage from the office.  When I do deposits there is always a large piece of the copy paper left, so I put it in here and use it for testing stamps, colors or pick up over spray I use the Copic airgun.  I love my racks for the copics.  I had them in a purchased holder but they sat upright and I had to have two containers because there are two different style pens;  They sell racks like these online but they are $17 each.  I made these from the bottom of a used priority mail box.  Covered it with pattern paper and added cardboard shelves.  Now I have them seperated in to color families and when I'm done I can just pop them back in and don't have to look for the little hole that they fit in to.  The acrylic box holds my acrylic blocks for stamping with acrylic stamps.  Lots of acrylic, hey?  lol. 
 This is my new love, the Vagabond designed by Tim Holtz and produced by Sizzix.  My long loved Cuttle bug and Cricket are behind.  I may or may not get rid of the cuttlebug, as the Vagabond does everything and more than it. 
 All my cutting dies and embossing envelopes at hand.
I'm so delighted with my little space and looking forward to hours spent in there creating this year.