Wednesday, November 25, 2009

Do I need more Christmas cards?

Probably not.  But I can't seem to stop making them.  Keep getting new ideas.  I saw a brownish card with a tree design on 2Peas, and then got this stamp from Unity, so had to try it.
Just slight variations in the design.  a little different shade of brown distressing and different placement.

Tuesday, November 24, 2009

My new Favorite

I worked for hours on this card and I absolutely love it.  So much so that I think it is going to be a card to me.  I don't want to give it away.  There always has to be one thing that I wish I had done differently though.  The clear snowflakes, I heat embossed with Kaleidoscope embossing powder.  It wasn't easy since they are a thin plastic and got very soft under the heat gun, but they survived and look pretty.  But, the bottom one I cut off thinking that it was going to keep the card from closing, and it really would have been fine.  The other snowflakes I have are much larger, so can't just replace it. 
The flourishes are Tim Holtz grungeboard elements. 

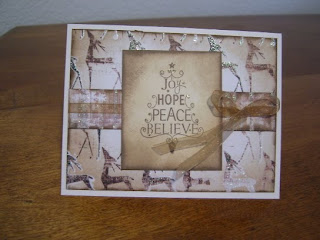
The little girl stamp is one I got today at a new stamp store I found in Tukwila.  I went looking for a vintage santa stamp and liked her better.  She is stamped in brown.  Joy is a Studio G stamp, heat embossed with black.  Gold embossed flourish is an Inkadinkado woody.  Sentiment is Wordsworth.  Patterned cardstock for the card base is from Printworks, Pattern papers are from DaisyD's.  The cs for the stamped image was distress inked with Fired Brick and Peeled Paint.  All edges are distressed with Walnut Ink Distress Ink.

This one I did yesterday.  It's a little more casual.  I like the combination of papers.  The Grungeboard element on the front is heat embossed with red ep, and then painted with Smooch paints.  It was okay with the Smooch, but I just liked it better.  Merry Christmas is a nameless acrylic.  Sentiment is one that I've had for a long time and the brand I don't recognize, Great Impressions. 


These cards are called Tri Fold Shutter card and the tutorial is on Splitcoaststampers.com.

Saturday, November 21, 2009

Who finds inspiration in their bathroom?

I figured out why I have this obsession with browns and blacks now in my cards.  I redecorated my guest bathroom, which just happens to be the closest to my stamp room.  I go in there to wash stamps etc when I'm working.  The walls were torquoise when we moved here.  Clyle was living with us and I didn't think that he would much like the the chiffon shower curtain, so I bought a teal and brown striped curtain.  Then I couldn't stand all that torquose, so I painted the walls brown.  That was ok for a while, but after Clyle moved out I decided to go back to my old chiffon curtain with the pale beige leaf pattern.  It was ok with the torquoise towels, but just didn't really do anything for me.  So I decided to go with blacks and browns, and I really like it now.  I hung the black and white floral picture back and added a few more little accessories and I really love it now.


So, I go back into the stamp room this morning and start making cards, and guess what I end up with?  You guessed it!


Am I sick or what?  Well, if I'm sick, I'll die happy.

Variation of Joy Fold card

I gave the first card that I made from this pattern away, so I wanted to do another before I forgot how to do it.  Then I decorated the little flap and put the ribbon on, and it would have been covered by the front.  So I cut the fron piece down, and I kind of like it.  Then I made a little boo boo where the outer button is, so I had to move the original place intended for the closure up to the top.  I just love how there is no such things as a real "mistake" in the craft.  You just do something else not originally intended with it.

I still kind of think that I'd like to do somthing else on the inside of this card.  But afraid it would just be too "busy.  The tutorial for the original can be found at splitcoast stampers.

Thursday, November 19, 2009

New Unity Stamps

Unity November Kit of the Month.  I love these Unity stamps.  The girls dresses on the second one are masked, stamped and cut out so that they could be in different colors.  The background is a shimmery embossed paper that was actually part of a Christmas pack.


A little different take on the same stamps.  First one is done with Tim Holtz Distress Inks, Worn Lipstick with a bit of Perfect Pearls for a little shimmer.  the black and white one is heat embossed with white.


.I almost wish that I didn't ink the edges of the white card, I think it would have been cleaner looking without it.  Base is embossed with Swiss Dots Cuttlebug envelope.

Disney on Ice


A fellow Pea (2Peas in a bucket) read my post about Disney on Ice and said he immediately thought of "Walt in Cryogenics".  Thought that was pretty funny.  Anyway, this is the only picture that came out and it was the back drop for the stage.  Thought it was kind of cool though.

Changed my settings

For my friends that don't have google accounts, I would love to hear from you.  So I changed my settings so that anyone can post a comment.  You will receive a prompt to copy some letters that will appear and it will not appear until I have reviewed it.  This will help to keep spammers from posting on the blog.  I hope to see some of you here!

Saturday, November 14, 2009

Lots O' Color

I was hoping to have pictures of Disney on Ice to post tonight, but our seats weren't as good as we thought they were going to be. We thought that being in row one right on the ice would be great. Wrong... they cut the "stage" ice in half and used the far end. What a dissappointment! It was pretty though and all the bright colors of Ariel and Tinkerbell and the whole gang inspired me to do something with lots of color. I am not very good at coloring in stamped images unless it's with ink, but these just scream for color. I found a ton of colored pencils that I haven't touched in years, so tried them. Did a little shading on the pink ones, it turned out okay I guess.

Thursday, November 12, 2009

A little more brown...and then i'll move on

Actually I did two more brown ones tonight but wasn't thrilled with the second one. Maybe it's because it had a little bit of color on it and i'm not in the mood for color I guess. This is my second attempt at this design. Background stamps are Unity, the others are CTMH.

It's a brown sort a' day

I don't know, maybe it's coming down off of all the pretty reds and greens from Christmas, but all of a sudden I am really enjoying the browns and blacks. I wanted to do a "tiled" cover, but this stamp was really too big to seperate them into three seperate tiles, so just mounted them as tiles on one mat. Stamp is CTMH. This was a lot of fun. It is the Brick Wall technique from Splitcoast stampers. I really like it and it was a lot of fun putting together. You have to be really careful to keep them in place after you cut them up or it's like putting a jigsaw together.


Wednesday, November 11, 2009

Friendship

This was fun to do and I think i'll do a couple more tomorrow. The tutorial was on Splitcoast Stampers. The closure for the little card is attached with double pop dots so that it holds the card together but you can still open it without damaging the closure. The stamp set is Close to My Heart.


Monday, November 9, 2009

I've gotta quit this

Got my new Stamps of Life set this week so had to put a few more Christmas cards together. The globes are all heat embossed in silver and cut out and attached with pop dots. The first one I cut the trees out, embellished with Stickles and put flock on th bottom of th globe. The ribbon was too white for the pattern paper so I spritzed it with a water/perfect pearls solution. It also gives it a faint glilmmer not seen in the picture. Snowflakes in all of the globes are white heat embossed. I wanted the deer to look like he was in the forest. He actually has longer legs but that wouldn't fit in the globe. He is heat embossed in gold.
Lights are painted with smooch inks. I really like that stuff and happened to catch a sale last week at the scrapbook store. Should I add "wire" to the lights?

I don't so much like the snowman that came with the set, so used this one from Close to My Heart. He is also painted with Smooch. I say paint but it's not paint at all but ink. It comes in a little bottle that looks like fingernail polish with a nib like a stiff little brush. I stamped him with archival ink and then got as close as I could with the Smooch without covering detail lines.


I finally figured out how to tie a descent bow. Not that they are perfect however. I was tieing a not and then tieing the bow, which apparently is wrong because when I quit doing that, and just twisting it they came out fine.